You can continue with the object you created in Lab 7 B, or download the file zodaMoreX.blend. Open it in Blender. In this third part, we will create a walk cycle for this creature, then import it in Unity.
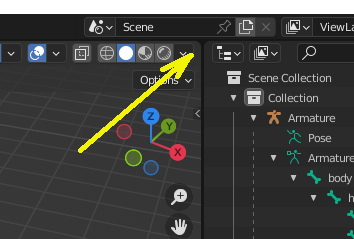
If you hover with the mouse over the top right corner of the window, between the scene and the hierarchy, the mouse will turn into a cross.You can pick the corner and drag it to the left to divide the area in two:
When dragging this corner towards the left, split the screen approximately in two equal parts. On the right side, click on the button in the bottom left corner showing a small cube and switch to Dope Sheet.
At the bottom of the screen, just above the timeline, click on Keying. Then click on the pair of keys just below Active Keying Set. Choose Location and Rotation from the options. This means that the animation will use the objects' location and rotation.
We build the motion by creating a number of key frames for it, and then letting the system interpolate all the intermediary positions.
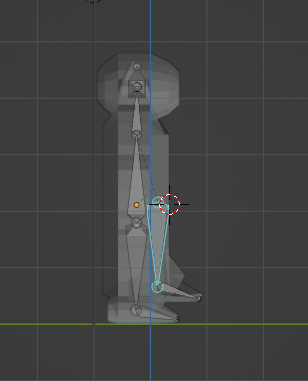
Select the Armature from the hierarchy and switch from Object Mode to Pose Mode. It's probably easier to work in wireframe at this point, or to turn the X-Ray on. Just go with the mode that seems easier for you.
In the Front Ortho view, select the right leg by clicking on the bone. Move the bone a little up with the G key or the move button on the left. Switch to a side view and move it a little towards the front. The result could look like this:
Back to the Front view, select the head bone. Then switch to the top view and hit R for rotate. Rotate the head around the vertical so that it is turned towards the leg that is up. Select everything by hitting A, then hit I to insert the key frame. In the Dope Sheet you will see an entry appearing for each of the bones.
In the Dope Sheet, zoom in a little (scroll), then click on frame 20. We'll insert a second key frame here. Bring the first foot down and move the second one up in a symmetric way. You can reset the pose first (if that makes it easier) from the Pose menu (close to View) select Clear Transform, then All. Rotate the head the other way. Select everything, then insert another key frame with I.
You can now play the animation by clicking on play in the timeline, or just move the timeline cursor back and front to see the effect.
Lets add an intermediate frame where both feet are down and the ears are also down a bit. Move the cursor in the timeline or dope sheet to frame 10. Move both legs to their original position (or reset the pose). The in the front view, rotate the bones of the ears downward a bit. Then select everything and insert another key frame.
Move the cursor in the dope sheet back to the first frame. In the scene, hit A to select all the bones. Then in the dope sheet, select all the components of the first keyframe using the mouse (dragging a box around them). Copy the keyframe with Ctrl-C. Move to frame 40 and paste it with Ctrl-V. Repeat the procedure to copy the pose from frame 10 to frame 30. Test the motion to make sure it looks good.
In the bar at the bottom of the dope sheet, set the End of the animation to 39 so that when it is run in a cycle, the first frame is not repeated. After that, if you play the animation, it will run in a cycle.
Let's save this walk cycle. In the bar at the top of the Dope Sheet, there is a box with the text Dope Sheet. Click on it and switch to Action Editor. To the right of it there is another box saying ArmatureAction. Check the box saying Manual Frame Range and set the end as 39. Then check the box Cyclic Animation. Then in the dope sheet, under Summary on the left, double-click on the ArmatureAction name and rename it as WalkCycle. Save the file.
Create a new Unity 3D project. Create a folder in Assets called Models and another one called Materials.
Add a plane from 3D objects. Color it the way you want (use a material). Call it ground.
Drag the file zoda.blend into the folder Models. It should appear the together with a folder for its materials. Select the zoda model and take a look at it in the Inspector. Click on the Animations tab. You should see the walk cycle we created, as well as a default take. Check the Loop Time under it to allow it to be played in a loop, then click Apply.
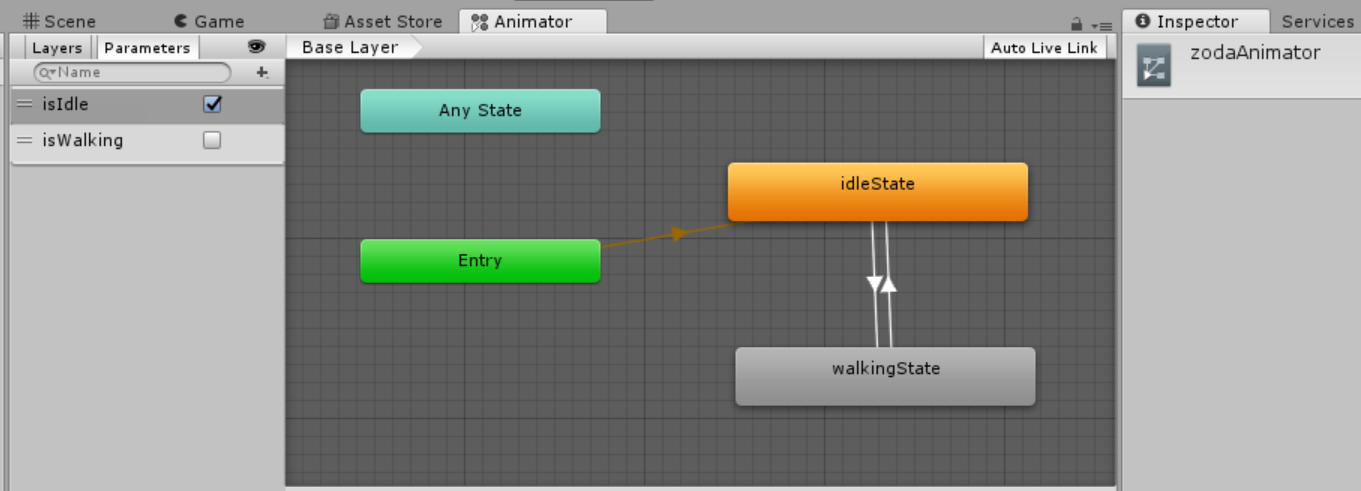
Right-click in the Models folder in the Assets (where zoda is) and create an Animator Controller. Name it zodaAnimator.
In the Inspector, click on Open in the animator's panel. It will open an animator window in the Scene area. Right-click in it and select Create State -> Empty. This will create a new node connected to the Entry. Click on the selection button next to Motion (which says None for now) and select the Walk_Cycle, or the name you gave it in Blender.
Then drag the zoda model to the scene and place it on the plane. Disable its camera and light source. In the Inspector, if the object doesn't have an Animator component, add one from the Miscelaneous category. Then in the Animator component, select the zodaAnimator as the Controller. Save your scene.
If the object looks weird, like the normals are not right, reopen the object in Blender, select the mesh, go into Edit Mode - Face, select all the faces, then hit Alt N for normals menu, then click on Flip from there. If you edited the original file outside of the Unity folder, you'll have to import it again.
Add a Box Collider and a Rigidbody to the zoda character with a mass of 0.1. Un-check the box Use Gravity in the rigidbody. You will probably have to edit the collider to fit the object better. Add the following script to the project, then add it as a component to the zoda character. Set the speed to 1.
If you run the program now, you will be able to move zoda around, but the animation cycle will be continuous.
To see the colors that we painted the model with in Blender, we need to apply a shader as material to the model. Download the following file and drag it into the Materials folder in Unity.
Create a new material and call it vertexShader. In the inspector, in the menu next to Shader, select Custom - VertexColorsStandard. Then apply this material to the zoda creature in your scene. It should now have the same colors as in Blender.
Click on the animation controller object in the assets and open it. Create another empty state. Change the Motion of the state connected to Entry into None (resting) and rename it Idle. Then set the motion of the new state to the walk cycle and call it Walking.
On the left side of the animator window, click on Parameters. Click on the + and add two Booleans, called isIdle and isWalking. Uncomment the two commented lines in the function Start in PlayerController.
Right-click on the Idle state and create a transition towards the Walking state. Click on the transition arrow itself and un-check Has Exit Time on the right to make the transition between the animations immediate. Below that (you may have to scroll down), you will see a list of conditions. Add a condition consisting of isWalking being true.
Set another transition from the walking state towards the idle state, also without exit time, with the condition that isIdle is true.
In the function Update add a condition where you check if rbody.velocity.magnitude > 0, and if that's the case, then set the isWalking bool to true and isIdle to false, and if not the other way around (see function Start). See an example of the setup below.
Now the walking animation should work only when the character is moving. If the character starts rotating while it's moving, pull it vertically off the ground by some small amount.
Finally, you can adjust the speed of the walking cycle in the animator (click on the walking state after you open it) to match the speed of the character.
For a more detailed walk cycle tutorial see https://www.youtube.com/watch?v=d-wQ8nRWTBs.
Some tutorials for Unity integration:
https://www.youtube.com/watch?v=3CSUxATQVLw
https://www.youtube.com/watch?v=p-_QyPu1oLI&index=2&list=PLpPd_BKE\UoYjGAUGaLp4q1AXR21VS-wVI