Date: Wednesday, August 26, 2026. To be turned in by Wednesday, September 2, 2026.
Open the Unity Hub and click on Projects, New
Project. Select Universal 3D. If this is the first time
you use this type of project, it will ask you to download the template
first. If you don't see it among the templates, check if there's a tab
called Learning above the template list. Click on it to switch to
All. Once it's downloaded, in the bottom right part of the project
creation window, give it the name ShortDemo and choose
the location you prefer for storing your Unity projects. Creating the
project itself may take a few minutes.
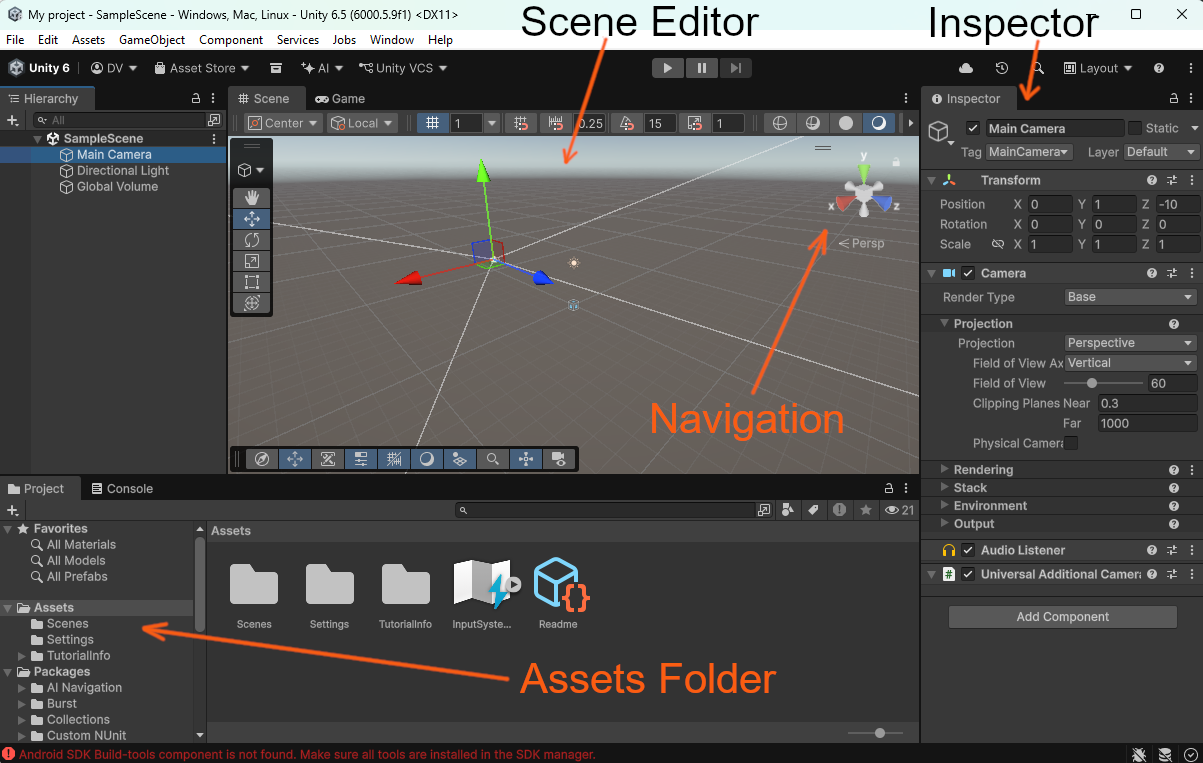
Once the project is complete, locate the following: the scene editor, the inspector, the Assets folder. See the demo video for details of where they are and what they do. In the image below, these items are highlighted, as well as the navigation tool in the scene editor. Click on the Main Camera to see its components in the inspector.
Rename the scene by going to File - Save As and give it the
name MainScene. Select the Scenes folder in the Assets
for this.
Click on the Game tab next to Scene above the scene editor. This will show what the game will look like when it runs. Go back to the Scene tab.
Let's add some objects to the scene to be able to see something running. We will create a box and a little ball bouncing around inside of it.
First, let's create a wall as a box. In the Hierarchy (top left side of the screen), click on the plus sign and choose 3D Object - Cube. A cube of side = 1 and centered in the origin will be added. In the Inspector, in the Transform at the top, change the scale to 10 x 10 x 1. Then change the position to 0 x 5 x 0 so that the bottom of the cube is aligned with 0 over the Y axis (vertical). Rename the object Wall1 in the inspector.
Use Ctrl-C and Ctrl-V (copy and paste) to create a copy of this object. Then change the scale of the object to 1 x 10 x 10 and the position to -4.5 x 5 x 4.5. Rename it Wall2.
Similarly, create 4 more copies of the object as follows:
| Object | Scale | Position |
| Wall3 | 1 x 10 x 10 | -4.5 x 5 x 4.5 |
| Wall4 | 10 x 10 x 1 | 0 x 5 x 9.5 |
| Wall5 | 1 x 10 x 10 | -4.5 x 5 x 4.5 |
| Wall6 | 1 x 10 x 10 | 0 x 9.5 x 4.5 |
The box should now be complete.
If you click on the Game tab, the box should be there, but we can't see a ball bouncing around inside of it. We can move the camera to show the interior. Click on the Main Camera object, then switch to the top view by clicking on the Y arrow (little cone) in the navigation tool. Click on the center cube of the navigation to switch to Isometric view. This will enable a more precise placement of the camera.
In the toolbar on the left side of the navigation window, make sure that the Move tool is selected (a cross). Drag the blue line (Z) and the red line (X) until the camera appears on the inside of the cube, in a corner. Then switch to the front view (Z) and do the same vertically. Check with the game preview to make sure you can see inside the box.
For a good view of what's happening, we also need to reorient the camera to look towards the opposite corner of the box. The easiest way is to set the rotation of the camera to 45 x 45 x 45.
Using the + button in the Hierarchy, add another 3D object of type Sphere. Place it at position 0 x 5 x 5. Rename it Ball. Let's make it red so that we can see it better. For this, we need to create a material.
Click on the Assets folder of the project. With the + button just below the tab Project, create a Material and rename it red. Click on this material in the folder. In the Inspector, click on the BaseColor and select a bright shade of red. You can try increasing the Metallic property (between 0 and 1) to make it shinier. Then click on the Ball object again in the hierarchy and make sure that Material is opened in the Inspector. Drag the color object you have create from the Assets folder at the bottom to the Element 0 in the Material component of the ball to apply the material to it. It should show as red in the Game preview.
To animate the ball, we need to add a rigid body and a script to it. With the Ball object selected, in the Inspector click on the button Add Component at the bottom. Select from Physics - Rigidbody. In this component in the inspector, un-check the Use Gravity option. Then in the Collision Detection, change the option from Discrete to Continuous.
Scroll down to the bottom of the option to New Script. Give it the name BallControl and save it in the Assets folder.
Double-click on the script to open it in the editor you chose. It should contain a function Start, that is automatically executed when the scene is loaded for execution, and a function Update, which is called in each frame of the game. At the top of the class, add the following line:
private Rigidbody rb;
In the function Start, add the following code:
float x= Random.Range(0f, 10f);
float y = Random.Range(0f, 10f);
float z = Random.Range(0f, 10f);
rb  = GetComponent<Rigidbody>();
rb.linearVelocity = new Vector3(x, y, z);
You can run the program now by clicking on the Play button above the scene editor. The ball should take off in a random direction, but not bounce against the walls yet. For that, we need to add a Physics material. Stop the execution of the program and go back to the scene editor.
In the Assets folder, click on the + below the tab Project and select Physics Material. Name it bounce. Click on this material and in the inspector, set its friction values to 0.2 each and the bounciness to 1. Then select the Ball object again and then drag the bounce material and drop it in the Sphere Collider component over the Material. This should be sufficient to make the ball bounce around. Test the program to see if it works. This is the end of the lab.
Take a screenshot of your whole Unity window with the program running and save it as a png or jpg file. Submit that as the result of this lab.