Dana Vrajitoru
I310 Multimedia Arts and Technology
I310 Lab 9
Date: Tuesday, October 28, 2014. Due: Tuesday, November
8, 2016.
In this lab we will create some animations using tools
from the Gimp.
Ex. 1
In this first exercise we will create an animated image
using rotation.
Open the Gimp and create a new image of a size of 200x200. Select a
circular region inside this image, as big as you want, in the center
of the image.
If you hold the shift while selecting the region, it
will be perfectly circular. That will work better for the effect we're
creating.
Set the background and foreground colors to two shades of a color
of your choosing, one of them dark and the other light. Click on the
gradient button (Blend Tool) and set the gradient type to be
a Spiral (cw). Fill the circular selection with this gradient
starting from the center and going out in any direction.
The closer to the center you stop with the end point of
the gradient, the more it will spiral around.
From the Layer menu, go to Transparency,
then Add Alpha Channel. From the Select menu choose
Invert, and then cut the white region out
by Ctrl-x. You can unselect the region at this point. Rename
the frame as "frame 1 (50ms)" (without quotes).
Here is an example of what you might have so far:

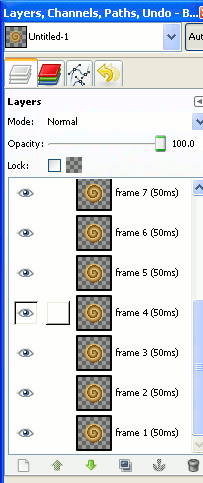
Duplicate this layer 11 times to have 12 number of copies
total. Rename all the layers the same as the first one with increasing
frame numbers (from 1 at the bottom to 12 at the top).
Here is an example of what the layers dialog might look
like:
Hide all the layers but the first two (click on the eye next to a
layer name in the layers dialog to hide it). Select the layer labeled
frame 2 (one up from the very first one that was initially the
background). Rotate this layer by -30 degrees - from
the Layer menu choose Transform, then Arbitrary
Rotation.
Before moving to the next layer, we want to make sure
that the layers are aligned with each other. If the selection is
perfectly round, then this shouldn't be necessary.
From the Layers dialog move the Opacity of this
layer down to about 30%. Click on the Move Tool
(cross-shaped) in the Toolbox and move the layer such that the center
of the spiral in the top layer is aligned with the one of the layer
underneath. Once this is done, move the opacity back to 100%.
We will rotate all the others by angles decreasing by 30
degrees every time.
Select the third layer and make it visible by clicking on the
eye. Rotate it by -60 degrees and align it like you did for the first
one. Repeat the operation for all the other layers, incrementing the
rotation angle by -30 every time.
Note that a rotation of -180 is identical to a rotation
by +180, so once you get to that angle you can use decrementing
positive values instead of negative ones. The last layer should be
rotated by 30 degrees.
Save your image in xcf format from time to time.
Let's see the result of the animation we created.
From the image widows, the Filters menu, follow on
Animation, then Playback. Play the resulting
animation.
At this point let's reduce the image size to the area
containing the animation.
Crop the image so that it contains the circles and some
transparent padding around them (use the Crop Tool). Save the
image as an xcf.
The next step is meant to reduce the file size of the
resulting animation.
From the Filters menu select Animation, then
Optimize (for GIF).
This will create a new window that looks like the
previous one. If you inspect the layers of this new window, you'll
notice that many of them are smaller than the image size.
From the image window, the Image menu, Mode,
select Indexed. Reduce the number of colors to 100 and select
an option of None for the dithering. Export this image as a
gif.
A dialog will open warning you that the image should be
exported because of the multiple layers.
Check the option "As Animation" in this dialog
then click Export. In the next dialog make sure the option
"Loop forever" is checked.
This will make the image animate continuously.
Find the image in Windows Explorer and right-click on it, then open
it with Firefox or another browser (not Explorer though).
You should see the spiral looping. Here
is an example
(http://www.cs.iusb.edu/~danav/teach/i310/spiral_rot.gif) of the
final result. Also, check the difference in file size between the xcf
and gif file.
Ex. 2
In the second exercise, we will create an animation
using filters.
Going back to the Gimp, create a new image of size 300x100.
In this exercise we'll be creating a banner. Think of a
text that you can divide in 2 parts to use on the banner (like,
Multimedia / Arts and Technology).
From the toolbox select the Text Tool (A). Click
somewhere close to the top left of the window.
This will open a dialog in which you can enter some
text.
Enter the first part of the content of your banner. You can close
the dialog. Without unselecting the text, increase the size (to
whatever still fits in the window but is visible enough), change the
font, modify the color of the text, to make it look good. Make your
text bold in a font that you like.
While in editing mode, the text layer is stored as text
with properties. Once merged with the image, it will be converted to a
set of pixels.
Position the text using the Move Tool so that it fits in
the center of the image. Once you are satisfied with the result, from
the image window, the Image menu, select Merge Visible
Layers (flatten image should do the same thing).
You should now have a single layer containing the text
as a bitmap (you can't edit it as text anymore).
Name this layer Frame 1 (500ms). Duplicate this layer 4
times (you should have 5 copies total). Modify their names as Frame 2,
3, etc., and delete the copy#1 and so on. Modify the timing
the following way: leave the first frame to 500, make all the
intermediate ones (2 to 4) as 70ms, and make the last one 150ms. At
this point save your image as an xcf.
The idea is to have the first and last ones last longer,
and the intermediate ones go by faster.
Apply the Gaussian Blur filter to the frames 2 to 5,
with a radius starting from 5 and increasing by 5 every time.
If you install the Gimp Animation Package with the Gimp,
this operation can be done automatically.
Once the operation is done, run the animation playback to see the
effect.
This should look like your text is being gradually
blurred.
Add a new non-transparent layer, in the background color. Name it
Frame 6 and set its timing to 300ms. Add another layer of text
containing the second part of your banner text. Hide the
non-transparent layer. Using the Move Tool, position the new
text so that it fits in the center and is aligned with the previous
one. Make its background visible again (frame 6). Make sure the text
layer is active, then from the Layer menu, choose Merge
down.
This should merge it with frame 6, and now we should
have a single solid layer with the second text.
Playback the animation again to see the effect. Save the image as
an xcf, then set its mode to indexed, and export it as a gif. Make
sure you select the Animation option for the export just like for
Exercise 1.
After exporting the image, you can view it with a
browser like the first one.
Apply the filter that optimizes the animation for GIF to this
image too. Go through the layers to see the effect. Then play back the
animation to see that the image looks the same.
Here is an example of resulting
image.
Save it and export it under a new name to see what the effect is
on the file size.
Ex. 3
In this exercise we'll use a couple of the automated
scripts to create animation in the Gimp.
Find an image that you like (from any source) and open it in the
Gimp. Resize it so that neither the width, nor the height are larger
than 600 pixels.
a. Spinning Globe
From the Filters, apply Animation - Spinning
Globe. You can play with the parameters if you like, then click
OK.
The script should run for a while, then produce a
separate window.
Test the animation with the playback, then export it to a gif as
animation.
b. Blend
Starting again with the resized original image, duplicate the
background layer twice. Select the middle one and apply one of
the lightning filters from Light and Shadow. Then from the
Animation filters choose Blend. Set the number of frames to
15 and make sure that the option for the animation to be looped is
checked. Then click OK.
This script should also run for a while, and then show
the result in a new window.
Check the animation effect with the playback, then optimize it
and export it as a gif.
Upload. The four gif images must be uploaded to Canvas as
part of Homework 10. You will have to create another one on your own
for the homework.