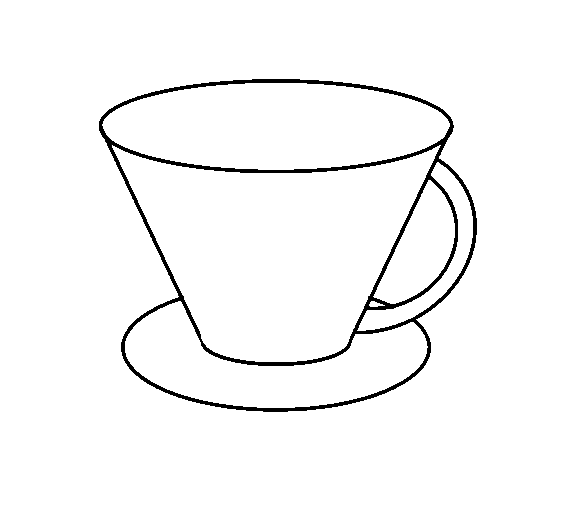
In this lab we will be learning about digital painting tools and will use them to color the line-art image below.
If this is the first time you've used the Gimp, an installation dialog will open. You can just click OK until it closes. Usually there's a "tip of the day" dialog that also opens when you start up the program. If it shows up, you can read it and then close it. By default there will be one toolbox (left) and one or more dialog windows opened (right). You can leave these open for now, but if you close them, you can find them again from the Windows - Dockable Dialogs menu. You will need the Layers and Brushes dialogs in this lab.
In Gimp, the menu from where you can find a lot of the operations to perform can be found at the top of the screen for Mac versions and on top of each image window for Windows versions. Locate this menu for now and come back to it as needed to complete the lab. You can also access its content by right-clicking in the image. Beside the menu, the Gimp usually has two toolbars that give access to tools, options, list of layers, and other things.
This is an image of type GIF, which is indexed. In particular, this one was created with a grayscale look-up table of colors. We will change that next to have more editing options.
No changes should be visible to the image, but this will allow you to work with any colors. I had saved this image originally in a grayscale format, so it will show as Indexed.
Images in the Gimp and Adobe Photoshop and other similar programs can be composed of several layers with independent content. The order of the layers is important for the final look of the created image. The Layer dialog in the Gimp can be found in the right-side toolbar and the button for it looks like a small stack of papers.
This should show that the image has only one layer, the background.
Once you have several layers, you can click on them in the Layers dialog to make them active. The active layer is highlighted in this list and all operations you perform on the image apply to it. You can also drag the layers up or down to change their order, choose which ones are visible, and so on.
This tool selects contiguous regions of the image by color. It is normally found in the Toolbox on the top row. When you click on this tool, the mouse pointer turns into a wand.
Everything but the cup should now be selected. What we want, in fact, is to select the cup itself and to move it to the new layer (cup) for easier manipulation.
We've cut the cup from the background layer and it is now in the clipboard. Now we want to switch to the new layer and paste it there.
The cup should appear again, but this time the layers dialog should show it in the new layer you created.
The left-side Toolbox contains a pair of boxes that are foreground and background color indicators, below the tools table. By default, the foreground is black and background is white.
In the same Toolbox, there is a Fill painting tool that looks like a paint bucket.
This should paint the handle in the color you selected before.
You can use the zoom tool if you need to for the small piece of the saucer behind the handle. To zoom out, you can use the zoom button at the bottom of the image window.
This will make sure that whatever you do next is restricted to this area.
The Toolbox contains an Airbrush tool that looks like a brush with a ribbon trailing form it. It can be used to paint with variable pressure.
Below the Toolbox, in the same dialog, you should now see a brush selection dialog. If it's not there, you can look for it in the Windows menu - Dialogs. When you click on one of the brushes, newer versions of the program let you set its size. Something like 5 is probably appropriate for the next step.
You can add some highlights to the saucer too with a larger brush if you want.
We will now draw a table in a new layer placed below the cup. The border will be made of two straight lines and we will fill the surface using a pattern.
The new layer will appear on top of the cup, hiding it.
The layer should now be between the background and the cup.
In the dialog on the right, this should display some options for the tool. Normally, double-clicking on a tool should bring a dialog of settings for this tool, if they are available.
This should draw a line segment in the image.
You can also keep the Ctrl key down for the second line to make sure it is perfectly straight.
We will use the wand tool to select the surface of the table. If the two lines don't go to the border of the image, we won't be able to isolate the surface of the table from the rest of the background with this tool.
If the wand doesn't seem to work, hold the shift down while doing the selection. Since the background is white, this should not make any difference yet, but the Layers dialog should show that region as being transparent (a gray checkered region).
This should hide the layer from the image. You shouldn't see the cup anymore in the image, but it is still there. We'll bring it back later.
The surface of the table should be selected now. We want to paint it using a pattern, so we'll configure the Fill bucket to use a pattern instead of the foreground color.
If you are not happy with the result and you'd like to try a different pattern, you need to undo the operation with Ctrl-z (Cmd-z on Mac) and then redo it. This is because the region is not uniformly colored after you fill it with a pattern.
You will have to click on the image several times to fill everything, but the pattern should look continuous. If it doesn't, you can use the pencil tool with a large brush instead, but make sure to use a single stroke to paint everything (as in, don't take your finger of the mouse until you're done).
The remaining of the lab will concern this top layer.
We will now paint the side of the cup with a gradient creating a lighter shade on the side on the handle.
In the Toolbox, there is a gradient tool called the Blend Tool, next to the Fill bucket.
This should open the gradient options dialog in the tool options space on the right.
The starting point of the gradient will mark the foreground (lighter) colors, and the end point will mark the background color. We'll make the color transition go at a slanted angle.
This should fill the exterior surface with a gradient simulating the lighting effects on the cup. You can repeat the operation, experimenting with the angle and the distance between the start and end points until it looks fine to you.
For the inside of the cup we'll use a vertical gradient coloring the bottom part in a darker color.
The darker color should be at the bottom. If that's not the case, you can redo the operation changing the direction of the gradient (from bottom to top).
We will now create a shadow for the cup by duplicating the saucer in a darker color and moving it below the cup and slightly to one side. We will also use transparency on it.
You can leave it above the cup layer for now.
Note that once a region is selected with this tool, you can adjust the borders. The selection should span the length of the saucer horizontally, cover its bottom border, and stop somewhere between the middle and the top.
You can correct the shadow later if you have to. The ideal would be for the top left corner of the copied saucer to cross the border of the original.
We're going to make the borders of the shadow look a bit blurry now.
Gimp "saves" files only in its native format .xcf, which is not compatible with most viewers and results in rather large file sizes. On the positive side, it is a lossless format, meaning that it preserves the quality of the image. To save this file in one of the more usual formats, we need to export it. Thus, it is recommended to keep an image in this format while you are still working on it, and export it when you're done.
A dialog might appear warning you that jpeg images can't handle transparency. It will offer an option to export the image, which will also flatten it. This operation merges all the layers into one, which is what we need to do anyway because JPEG images can't have multiple layers.
This is the end of the lab and the JPEG file is the one you need to turn in. There will be more to do for the homework.
The only file you need to upload from this lab as part of the homework is the jpeg one. You will work on another image on your own for the homework.