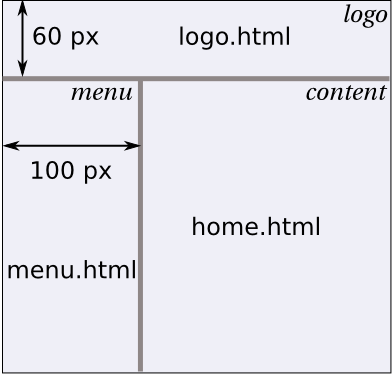
In this lab we will create a few web pages to explore document division and web site organization. Please read and/or watch the slides 14 to 18 from I310_02_web.swf and I310_02_web.pptx from last week before doing the lab. Here is an overview of the document structure we are aiming for:
Ex. 1 The Frameset
Open Adobe DreamWeaver and create a new HTML page. Save it under lab2main.html. In the code area of this page, replace the <body> </body> part with a frameset. For this, create a horizontal frameset that will divide the page into a narrow top meant to hold a title or a logo, and the rest of the page left for the content. The code for this would be
<frameset rows="60,*" border=1>
and close the frameset with the appropriate tag.
Inside this frameset, create a frame with no scrolling bar, displaying the file "logo.html" and with the name "logo". The code for it should be
<frame scrolling="no" src="logo.html" name="logo"> </frame>
Instead of a second frame, we will have a frameset divided in columns this time. The goal is to have a narrow column on the right for a menu and use the rest of the window to display the content. The frameset would look like this:
<frameset cols="100,*" border=1>
Create two frames inside this second frameset. The first one should be of the no scrolling type and should display the page menu. The second one is where the files linked in the menu will be displayed.
Add a first frame inside this set that does not have a scrolling bar (like above), displaying the file "menu.html" and with the name "menu". Add a second frame after it, this time without a scrolling attribute (by default it will add a scroll bar if needed), displaying the file "home.html" and with the name "content".
Ex. 2. Content
Create 3 more html files with the names that we have used in the frames. Make sure to save all the files in the same folder. Set the color scheme for them (background and text) the way you want.
The file logo.html should just contain the text "Title" or "Logo" in heading 1 style.
The file home.html should contain something like "Welcome to our site". You can add more to it later.
In the file menu.html, create a table with five rows and a single cell per row. The first cell should have the text "Home". The second one should contain the text "Contact us". You can name the remaining 3 whatever you want.
Division. Create an additional file called contact.html. Here we would like to create a division box that has a fixed position on the page and set its attributes to make it stand out. When editing this file, switch to the Classic layout for the workspace (in the top right corner). Then click on the Layout tab in the toolbar at the top (second tab from the left) and then on the Draw AP Div.
When you move over the preview part of the page, your mouse should look like a cross. This means that you can create the division box by click-and-drag, then adjust its position and dimension like in a drawing program. Make it look like a business card placed wherever you want on the page. Inside this box write your name and IUSB as the contact address.
Note. If your version of DreamWeaver doesn't have the Classic workspace (like the one on campus computers), then here is some code (divCode.txt file) you can copy and paste instead. You must place the entire style block in the head part of your document and the div part in the body.
Now take a look at the code. You should see a division created with id something like apDiv1 and with the properties defined in a block of css style that was added. Back in the preview, click on the box to select it, then take a look at the Properties tab at the bottom of the window. There you should see the position and dimensions of the box, as well as a property called Bg color. The little box next to it should let you pick another color for the background of this box. Choose one that stands out from the page color.
Going back to the code, let's add a couple of properties in the style part. Inside the block that starts with "#apDiv1 {", add a new line before the closing brace "}". What we want is for the text not to stick to the border but start a little to the inside. For that, add the line
padding: 10px;
This creates a padding zone of 10 pixels on all sides of the box and pushes the text inside.
Add another empty line and on it start by writing
border:
Note that a list of options is now available. Choose "double" from it, or whatever you would prefer instead. Then repeat the operation to add a border-color property and then in the little menu that appears when you type the colon (:) use the color picker to select a color.
Save this file and go back to menu.html.
Back in the menu, add a link to the text Home that loads the file home.html into the content frame. For that, add the following tag before the text:
<a href="home.html" target="content">
Then close the tag with </a> after the text.
Repeat the operation to add a link on the text "Contact us" that loads the file contact.html into the frame "content".
Open the file lab2main.html in a browser (double-click on it or right-click on it to choose the browser) and make sure that the two menu items you have links for are working properly.
Upload the files created so far to Homework 2 in Canvas. This will be 5 points of your grade for Homework 2. You can also use these files as a starting point for the homework.