In this lab we will start writing a game of Skittles, which you will complete in the homework. Before you start, you will need to have Blender installed on your computer for the 3D objects to work. If you haven't done it yet, you can install it from www.blender.org.
Here is an example of the finished game (http://www.cs.iusb.edu/~danav/teach/b583/skitGL/). Note: I added one spotlight to the game area. The big pink rectangle is the New Game button.
Create a new Unity 3D Core project called
Skittles. Download the following resources a local folder:
bump.mp3
push.mp3
peg.blend
spinner.blend
In Unity, create the folders in the Assets: Art, Scenes, Sounds, and Scripts. From Windows, drag the the blend files to the Art folder and the mp3 files into Sounds. Save the scene as skittles in the Scenes folder you created.
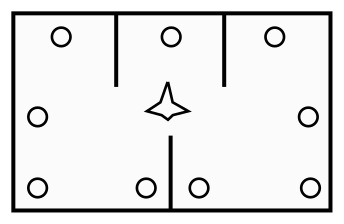
Here is the configuration for the game:
Click on the camera object. In the Inspector, switch it from Perspective to Orthographic, then in Clear Flags switch to Solid Color. Adjust the background of the camera with a color of your choice. Switch the Layout to Default if it's not that already (top right of the windows, above the inspector). Use the right-click and drag to bring the rectangle facing the camera into view. In the top right corner of the scene there is a white square with some colored arrows marked x, y, and z (the gizmo). Click on the square to turn the display of the scene to Iso.
Here are some useful tools while editing a 3D scene:
From the Create menu, 3D Object under the Hierarchy, add a Quad object to the scene and call it floor. Click on the Art folder, then from the + button above it, create a new material and call it floorColor. In the inspector, click on the rectangle next to Albedo and select a color for the floor, such as dark red.
Select the floor quad again from the hierarchy. Under Materials in the inspector you should see an array of size 1 (click on the arrow next to it to expand it if necessary). Set the Element 0 of this array with the color material that you just defined. Set the scale of the floor to 15 over x and 8 over y, then its rotation around x to 90. If you run the app now, it will have disappeared. This is because the camera is looking at it sideways.
To be able to see the floor, let's re-orient the camera so that it faces it at a different angle. Set the rotation of the camera over x to 10 degrees. You should see a little of the floor now. Set the x rotation to 75 degrees and the coordinates to (0, 2.5, 0). You should see a good part of the floor now. Then set the position of the floor object to (0, 0, 0). The entire floor should be visible now in the application window.
Add a box collider component to the quad from Physics.
Add 4 walls to the box by using quads and give them appropriate names. The front and back ones need to be scaled at 15 over x and you can use 4 over y, then the position should be at 0 over x, 2 over y in both cases, and -4 and 4 over z. You don't need to rotate the front and back walls.
The left and right walls will need to be rotated by 90 over y. You should scale them at 8 over x and 4 over y. The position should be at -7.5 and 7.5 over x, 2 over y, and 0 over z. Check with the Game tab and if any of your walls is not visible, add 180 to its rotation over y (only the front facing side of the quad is visible).
Create a material for the walls in a lighter color. When you set the color for it, set the value of Alpha (transparency) to something around 100 (over 255). You can adjust this later to look better. Set the Rendering Mode for this material to Transparent.
Add a box collider to each of them. Finally, add the 3 smaller walls that create the separations inside the box. Note that two of the walls left and right need to be rotated by 90 degrees over y and scaled by 8 over x, to match the settings of the floor.
In case your box coordinate and dimensions don't quite work, here are some settings I've used; these actually work well with the camera using a Perspective projection:
| Object | Position | Rotation | Scale |
| Camera | (0, 7,22, -4.43) | (60, 0, 0) | (1, 1, 1) |
| floor | (0, 0, 0) | (90, 0, 0) | (15, 8, 1) |
| front wall | (0, 1.5, 4) | (0, 0, 0) | (15, 3, 1) |
| back wall | (0, 1.5, -4) | (0, 0, 0) | (15, 3, 1) |
| left wall | (-7.5, 1.5, 0) | (0, 90, 0) | (8, 3, 1) |
| right wall | (7.5, 1.5, 0) | (0, 90, 0) | (8, 3, 1) |
On your own: add the smaller 3 quads for the interior walls in the overall figure of the box above.
Visible face.
Quads have a single visible face. Once you have all your objects
in place, if some of your quads are not visible from the camera
position you chose, duplicate those quads (Edit menu or Ctrl-D) and
then rotate them around y by another 180 degrees or equivalent. For
example, if the angle was 0, replace it with 180. If it's 90, you can
replace it with -90 and the other way around.
Drag the peg object from the Arts folder to the scene. You can set its color by creating a new material for it, like you did for the other objects.
The object you added may come with its own camera and light source, both of which upsetting the scene we've created so far. Since we don't want to use them, click on the peg object in the hierarchy, on the arrow next to its name to show the children. Then click on the Camera and make it inactive in the inspector by un-checking the box to the left of its name. Repeat the procedure for the light source.
Add a Rigidbody component to it from Physics with a mass of 0.03. Then from Physics again, add a Box Collider to it. In the inspector, click on Edit Collider, switch to a view facing the front of the peg, then edit the box to overlap the object as well as it can. Leave the peg floating a little above the floor, then play the app. You should see it fall to the floor and rest there. You will also probably need to scale the peg object down some.
Add a script component to it called PegManager and for now just declare a public bool attribute called standing and set it to true.
Then from the Tag at the top in the inspector, click on Add Tag. In the list of tags, click on the + and then add the tag peg. Click again on the peg object and set its tag to "peg".
Add a component to the Peg of type AudioSource from the Audio category. Add the two sounds to the resources in the folder Sounds and then set the Audio Clip of the audio source component as the sound bump.mp3. If you run the application now, you'll notice that you hear the sound at the start. Un-check the option Play on Awake in the audio source.
At this point you can create a prefab from it by dragging it to the Prefabs folder. After that, use the prefab to create more copies of the peg and place them approximately in the locations marked in the scheme above. You can also duplicate the first peg you have to create more copies so that you don't have to move them far.
Add a Rigidbody component to it from Physics with a mass of 0.1. Click on the Constraints to show the options, then check Y under Freeze Position in this component and X and Z in Freeze Rotation. Under the Rigidbody component, change the Collision Detection mode from Discreet to Continuous Dynamic. This will prevent the spinner from flying through the walls if it goes too fast.
Add an audio source to it and place the sound push in the Audio Clip.
In the Assets, in the Art folder, create a material of type Physic Material and call it bounce. Set the bounciness to 0.8 and both frictions to 0.1. Then drag it over to the hierarchy and apply it to the spinner object. You will find it in the Sphere Collider component under Material. Create a second bounce material with a bounciness of 0.6 and frictions set to 0.4 and set the Material in the Box Collider of the Peg prefab (!) with this material.
Add a script component to the spinner and call it SpinnerManager. Add the following function to this class and call it from the function Start:
public void RollSpin()
{
    GetComponent<AudioSource>().Play();
    GetComponent<Rigidbody>().velocity = new Vector3(Random.Range(-30f, 30f), 0f, Random.Range(-30f, 30f));
    GetComponent<Rigidbody>().AddTorque(new Vector3(0f, Random.Range(-30f, 30f), 0f));
}
Now the spinner should be randomly spinning at the beginning of the run.
Font. Look up a free font on a page such as
www.1001fonts.com
http://www.fontsquirrel.com/
Download a font you like. If it comes in a zip file, extract the files first. Then locate a file with the extension .ttf. Drag this file into Unity, into the Assets folder. You can create a folder for them if you are trying more than one. Now the font should be ready to use. Create an empty object with a legacy Text Mesh component, placed at the top of the window, with the text "Move Count". Select the font you added for it in the Inspector and adjust the font size and the character size. You will most likely need to rotate the object around the X axis to get it to show in the window properly. Add a reference to it of type GameObject in the class SpinnerManager and connect it in the inspector.
This will be continued in the homework.