In this lab we will start writing a puzzle game similar to the game
of Memory called Sum Zero, which you will complete in the
homework. A working example.
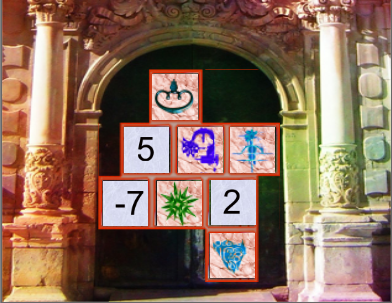
Here is a snapshot of the game:
All the tiles start up showing a glyph. When the player clicks on a tile, it reveals a number between -9 and 9. The player can only open at most 3 tiles at a time. The goal is to identify 3 tiles whose sum is equal to 0.
Create a new Unity 2D project called
Sum Zero. Download the following archive of images to a local
folder and extract the files:
lab2img.zip
You will find a folder called lab2img in the zip file.
In Unity, create four folders in the Assets: Art, Prefabs, Scenes, and Scripts. From the file explorer, drag all 8 the gliph#.png files and opentile.jpg into the folder called Art in Unity. Choose one of the frame images and one of the door images and drag them to the Art folder. Save the scene as sum0 in the Scenes folder you created.
Start by adding the door image and adjust its size and position so that it fills up the entire screen in the Game area. Then add the frame image, then resize it and place it so that it fills up the dark area in the doorway. Then deactivate both of them for now, to have a clean space to work on the next part.
Drag the sprite opentile to the scene and rename the object tile. Scale it up so that you can see it well in the scene.
Add a script component to the tile and call it ClickTile. At the top of the class ClickTile, declare two public attributes of type Sprite called tileGliph and tileOpen. Save the script and go back to Unity. These should show up as attributes in the script area of the tile. Drag and drop the sprites gliph0 and opentile from the Art folder onto these attributes.
Going back to the script, add the following code to the function Update. Basically we're setting up the tile so that when we left-click on it, it turns into the light blue "open" one, and when we right-click on it, it displays the glyph:
if (Input.GetMouseButtonDown (0))
    GetComponent <SpriteRenderer> () .sprite = tileOpen;
if(Input.GetMouseButtonDown(1))
    GetComponent <SpriteRenderer> () .sprite = tileGliph;
Compile the code and then go back to Unity and test it.
Flags. To get closer to the functionality of the tiles in the game, we need a flag of type bool to keep track of the state called isOpen. Declare it as public in the class and initialize it as true in the function Start. Then modify the function Update to add the following functionality: on left click, if the tile is opened, then close it by setting its sprite as the glyph. If it isn't open, the open it by setting its sprite the right way. In both cases, turn the flag isOpened to true or false accordingly.
Now a left click should toggle the glyph on and off. Turn the operations in each case into public functions called OpenTile and CloseTile and replace the code you took from the function Update with appropriate function calls.
In anticipation of later needs, let's add a couple of public int attributes to this class, called myId and myNumber. The first will identify each tile in the game uniquely with numbers from 0 to 7. The second will contain a random number assigned to this tile. Initialize both of them as 0 in the declaration.
Text object. When we open the tile, we will have to display the number associated with it. Create an empty game object called showNumber and add a Text Mesh Pro component to it. If this is the first time you use Text Mesh Pro, Unity might ask you to import some tools related to it. Click to import both of them, then close that dialog when done.
Make the text display a number (like -2), set the font Arial (or the default font if there is one), set the alignment as Center, and then adjust the size and position of the text so that it fits nicely over the tile. Then in the Rect Transform section of the object above the Text Mesh Pro component, set the Pos Z attribute as -0.1. This will make the text closer to the camera than the tile itself, and this will make sure that it will always be visible.
Child object. In the Hierarchy in Unity, drag the text object showNumber onto the tile object, to make it a child of this object. If we do this, then the text will move and scale with the tile object from here on.
Let us turn the text displayed on the tile to an empty string when the tile is closed. First, add the following line at the top of the script, where all the "using" statements are:
using TMPro;
Then add the following line to the
function CloseTile in the class ClickTile:
GetComponentInChildren<TextMeshPro> ().SetText("");
Now when you run the program, the tile should appear without the
text. Then in the function OpenTile, make the text visible
again by adding the call
GetComponentInChildren<TextMeshPro> ().SetText("" + myNumber);
Finally, we've defined the tile with an open sprite and a number displayed on it. When the game starts, though, we would like the tile to be closed. For this, simply call the function CloseTile in the function Start.
Tile in Frame. We would like now to place the tile in the first square of the frame. Activate the frame object to make it visible again. Then move the tile over the top square and resize it to fill up the square. To make sure that the tile is in front of the frame, verify that the Pos Z coordinate of the tile itself is at 0, and set Pos Z for the frame at 0.1. Then set the Pos Z coordinate of the door object at 0.2. This will ensure that the frame is in front of the background and the tile in front of the frame.
By creating a Prefab, we are creating a class of objects from an existing object, allowing us to create additional instances of this object and to easily modify their common properties. Drag the tile object from the Hierarchy onto the folder Prefabs in the Assets. The tile should now be displayed in blue in the hierarchy. Rename the object in the Hierarchy as tile0 (but leave the prefab name as tile).
Additional Tiles. Let's create additional tiles using the prefab. Drag the tile from the Prefab folder onto the scene 7 times and place each of them in one of the squares of the frame. Rename them tile1, tile2, and so on. Then set the value of myId with values from 0 to 7. Then for each of the additional 7 tiles, click on them and drag the corresponding glyph from the Art folder onto the attribute tileGliph. For example the tile with myId=3 should have the attribute tileGliph be the sprite gliph3.
Let's test the mouse click functionality. It should still work, but all the tiles should open or close at the same time. This is because Input.GetMouseButton gives us information about a mouse click anywhere in the window, not specifically on any of the tiles.
Mouse Click. There might be several different ways to solve this problem. Here is a fairly simple way. Unity provides other callback functions in classes derived from MonoBehavior that we can use. A set of them are called when the mouse is over the object, out of the object, or when there is a click on the object. However, the latter only connect with a left click, and not with a right click. So we will use the functions OnMouseEnter and OnMouseExit instead.
First, we need to prepare the tile prefab for it. In
Unity, click on the tile prefab in the Prefab folder, then add a
component to it (and not to one of the 8 tiles in the game area):
from Physics 2D, choose a Box Collider 2D. This is a
rectangle that is added to the tile, of the same size as the tile,
that is set up to cause callback functions to be called in overlap
events, including with the mouse pointer. With a collider in place, we
can add the following callback functions to the
class ClickTile:
void OnMouseEnter() {
}
void OnMouseExit() {
}
We will use a flag that can be raised when the mouse is over a specific tile. This way, when a mouse click happens, only the tile whose flag is raised will react to the click. Declare a private bool attribute called mouseIsOver and initialize it as false. In the function OnMouseEnter turn it to true, and in the function OnMouseExit turn it to false. Then go back to the function Update and place everything in it inside a test for mouseIsOver being true. Test this new functionality to see that only the tiles we click on open and close.
Random Number. We can take one more step with the tiles now
by randomizing the numbers they contain. We have chosen the range
[-9, 9] for these numbers. The function Random.Range(min,
max) generates a random number in a the range [min,
max-1]. Thus, add the following line to the
function Start:
myNumber = Random.Range(-9, 10);
Test that this works, and run it a second time to make sure that you get different results. This is all we can do with individual tiles for now.
Frame Object. We will need an object in the game to coordinate the tiles, keep track of how many of them are open, and verify that the sum is 0 when 3 of them are open. The frame object seems to be the best candidate for this. Let's add a new script component to this object called FrameManager. Move the script from the Assets folder into the Scripts folder, then open it in your script editor.
References. The tiles will need a reference to the frame
object so that they can communicate to it when they are clicked. It's
simpler to make it a class attribute. Add the following to the
class ClickTile:
static public GameObject frameRef;
The easiest way to initialize it is to set its value from the function Start in the class FrameManager. Add the following line to it: ClickTile.frameRef = gameObject;
The expression gameObject identifies the GameObject instance that the current script is a component of.
The frame object itself will need to keep a reference to the tiles
so that it can signal them to close when the sum of the 3 open tiles
is not 0. Let's store them in a static array. Declare the following
attribute in the class FrameManager:
static public GameObject[] tileArray = new GameObject[8];
Then in the function Start in the
class ClickTile, make the connection with this array by
doing
FrameManager.tileArray[myId] = gameObject;
We can't test it for now.
Game Solution. We must make sure that we have at least one solution to our game. For this, we will select 3 tiles in the game and set the number associated with the third one as the negative of the sum of the two others. Let's write a function in the class FrameManager called MakeSolution() with the following code:
// Makes sure that the game has at least one solution
void MakeSolution () {
    int tile1 = 2, tile2 = 4, tile3 = 6;
    int num1 = tileArray [tile1].GetComponent<ClickTile> ().myNumber;
    int num2 = tileArray [tile2].GetComponent<ClickTile> ().myNumber;
    // Make sure we don't end up with a number less than -9
    if (num1 + num2 > 9) {
        num1 -= num1 + num2 - 9;
        tileArray [tile1].GetComponent<ClickTile> ().myNumber = num1;
    }
    // Make sure we don't end up with a number larger than 9
    if (num1 + num2 < -9) {
        num1 -= num1 + num2 + 9;
        tileArray [tile1].GetComponent<ClickTile> ().myNumber = num1;
    }
    tileArray [tile3].GetComponent<ClickTile> ().myNumber = -(num1 + num2);
}
This function creates the solution involving the tiles 2, 4, and 6. Part of the homework will be to randomize them, choosing 3 random and different numbers between 0 and 7.
The question is now, where to call this function? We cannot call it from the function Start because we don't know in which order the functions Start will be called for each object. Even if we were to randomize the tile numbers entirely in the class FrameManager, we would still need the array tileArray populated before we can change any of these numbers.
Thus, we need to call this function from the function Update in the class FrameManager. The functions Update are only called for any object after all the functions Start have been called. But we still want to call it only once per game.
Add a private bool variable in the class FrameManager called gameStarted initialized as false. Then in the function Update, add a test for this variable and if it is false, then call MakeSolution(). In the same block, after the call, set the variable gameStarted to true. This will prevent the call from happening more than once.
Open Tiles. Next, the class FrameManager needs to
keep track of the open tiles. Declare two private int
attributes called countOpen and sum, both
initialized as 0 in the function Start. Then declare the
array
private int[] chosenTile = new int[] {-1, -1, -1};
PlayTile. Let's add a function called PlayTile in the class FrameManager with two parameters for the id and the number of the clicked tile.
// To be called when a tile is clicked open with the tile's id and number
public void PlayTile(int id, int number) {
    chosenTile[0] = id;
    sum = number;
    Debug.Log("Clicked tile: "+ id + " with number: " + number);
}
Call this function from the function OpenTile in the
class ClickTile the following way:
frameRef.GetComponent<FrameManager>().PlayTile(myId, myNumber);
Note that this function is just a stub. You will have to complete the implementation of this function as part of the homework.
Countdown. The last thing we will implement in this lab is a
countdown to closing the open tile in the
class FrameManager. Add the following attribute to the
class:
private int timeLeftToClose = 100;
In the function Update (same class) add an else
to the test for gameStarted being false where you
check if the value of chosenTile[0] is not -1. If it isn't,
then decrease the value of timeLeftToClose by 1. When this
value becomes 0, call the function CloseTile on this tile the
following way:
tileArray[chosenTile[0]].GetComponent<ClickTile>().CloseTile();
chosenTile[0] = -1;
Then going back to PlayTile, reset the value of timeLeftToClose to the default starting value (you can make that a separate attribute or constant).
Test this functionality. Now when you click on a tile to open it, it should close on its own after a while. However, if you open a second tile before the first one closed, then the countdown starts again on the second tile, and the first one will stay open unless you close it. You can experiment with the default value of the countdown to find one that works well for you.
The game is close to working now and you should have all the needed elements to finish it. This will be continued in the homework.